
WARNING: ONLY For use of the certified technicians
Disconnect electricity before to starting
IMPORTANT
1-New Manufacturer design Perfect fit Whirlpool brands include Whirlpool, Maytag, KitchenAid, Jenn-Air, Amana, Magic Chef, Admiral, Norge, Roper, and others
2-You can see that the part looks different but fits perfect with your old model.
This is a ‘NEW MANUFACTURER DESIGN’.
IMPORTANT: Your old part number is no longer available, we ship new part #, perfect fit old and new serials, If you need help send picture of the old part #
ONLY FOR CERTIFIED TECHNICIANS
DISCLAIMER: NO RETURNS ALLOWED IF THE BAG OR BOX IS OPENED (Watermark in each item)
Buyer pays return shipping ($4.95 to $12.00 1st Class), 8-10 days return time Approx.
We need tracking confirmation before to return
Important to know

Any questions about the installation, see youtube video: Gtw10613606 heavy duty, commercial parts.
Step-by-step installation for OLD SERIALS
 STEP 1
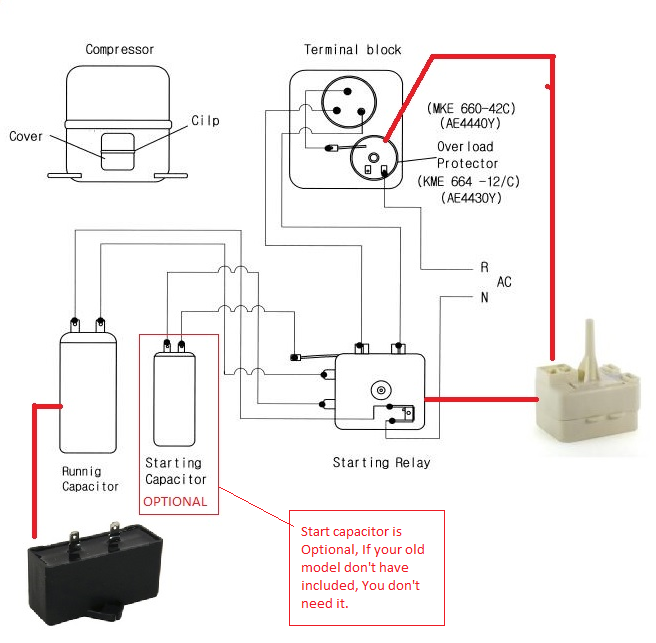
Locate the harness adapter, back connectors and heat shrink tubing that is included in the compressor kit.
Cut the existing connectors off the unit’s compressor wires provided
 SETP 2
Locate the harness adapter provided with compressor kit, Insert the wires of the harness adapter into the back of the connectors and tighten with pliers.
 STEP 3
Connect the two small connectors provided by us to the compressor relay (the part you purchased) making sure the tab snaps into place.
Install the part on the compressor making sure that the compressor clicks in place.
Any questions about the installation, see youtube video: Gtw10613606 heavy duty, commercial parts.
This model replaces most of the old models
BEFORE TO REPLACEMENT - TEST COMPRESSOR


The compressor motor for continuity using a multitester. Set the multimeter to the ohms setting X1.Place one probe on any terminal and then touch the other probe to each of the other two terminals. The multitester should display a reading of zero ohms.
Now move the first probe to a different terminal and test the other two terminals with the other probe. Finally, move the first probe to the last terminal and test each of the other terminals with the other probe. Every test should have continuity or low ohms depending on the compressor, with the multimeter displaying zero ohms. If the compressor motor does not pass all of these tests, the compressor will require professional service and new compressor.
Now test the compressor for ground. With the multimeter still set to X1, touch one probe to bare metal on the compressor housing (it may be necessary to scratch away a little paint to expose the metal). Touch the other probe to each of the three terminals in turn.
None of the terminals should have continuity; the multitester should display a reading of infinity. If any of the grounding tests show continuity, the compressor will require professional service and new compressor.
Was this article helpful?
That’s Great!
Thank you for your feedback
Sorry! We couldn't be helpful
Thank you for your feedback
Feedback sent
We appreciate your effort and will try to fix the article